Check out these design tips. This advanced information will help you create professional digital files suitable for producing quality Custom Products.

Include A Bleed
Our Product Builders Apps only show the live print area. But you should still extend placed images and graphics 1″ beyond the live area even though you cannot see it on your screen. Having this extra Bleed will help us when producing your products. If you forgot to add Bleed or cannot add it due to artwork issues, our production team will do it for you. We are experts at PhotoShoping extra image.
Spelling Errors and Mistakes
It is very easy to make mistakes in your document when you’re looking at it only on the screen. Print it out and review it in hand. Check for inconsistencies and design problems. Don’t forget to check your spelling, punctuation, and grammar. Run the spell checker. It’s a good idea to have someone else look at it too. They may see something you’ve been looking at and have totally missed. NOTE: We DO NOT check your work for spelling errors. If we do notice something that looks incorrect we will contact you.
Color Mode and Your Computer Monitor
There are going to be some differences between images on a computer monitor and your final product. Monitors, Scanners and Digital Cameras create images using combinations of just three colors: Red, Green, and Blue (called “RGB”). These are the colors that the computer uses to display images on your screen. But most printing process uses Cyan (blue), Magenta (red), Yellow and Black (called “CMYK”). Be aware that it is possible to make colors in RGB that you can’t make with CMYK. They are said to be “out of the CMYK color gamut”. What happens is that the translator just gets as close as possible to the appearance of the original intended color. It’s something that everyone in the print industry puts up with. (Very bright colors/fluorescents are impossible to achieve)
Contour Cut Graphics – MetallicHeads, Clear Drumheads, T-Shirts
We can print and cut graphics into text, circular, rectangular or an arbitrary shape that you design. This allows graphics and text to be placed on top of MetalicHeads, Clear drumheads and T-shirts. We can also make Stickers into shapes too. Graphics can be Full Color Printed or Single Color and made out of solid color films, chrome & sparkle films, and specialty films. With the printed process, the printer will first print the graphic, then it will cut it into the shape. In order to cut-out graphics, we need an outline drawn around the intended printed image, graphic or text. This line MUST be created with a Vector software program such as Adobe Illustrator, Inkscape, or Corel Draw. PhotoShop does have a Pen Tool to draw Bézier curves and paths. (In Photoshop save your work path in the Paths window menu). Then export the path as a .ai file. Your file can be opened into a Vector design program. If you cannot add the Contour Cut Line, we can do it for you but we charge a fee for this service. The fee is quoted based on the complexity of your artwork. See Example.
Create Contour Paths – Around Raster Images
There are multiple ways to create a Contour line around a raster image. Start by placing your original image into a Vector drawing program. This can be a photo, logo or any graphic. Most Vector software programs have a “Live Trace” function. The computer will then draw the path for you. It’s easy to do and there are plenty of YouTube videos that explain how this function works. But by using this method your path quality may vary because software tracing programs can create jittery lines. In order to get the most accurate path, use the Pen Drawing Tool in the vector program. This tool allows you to freehand draw the path with perfect accuracy. You will need some skill to use the pen tool. This method works the best but it also takes more time. You could do a combination of the two methods. Let the computer draw the path and then go back and clean up the areas where the computer did not quite draw the path how you envisioned. PhotoShop does have a Pen Tool to draw Bézier curves and paths. (In Photoshop save your work path in the Paths window menu). Then export the path as a .ai file. Your file can be opened into a Vector design program.
Save Your Path – In your Vector program, once your path is created make it 100% Magenta, stroke it to .25″ and place it on a separate layer. Name it Contour Cut. Save as .eps and check mark the “Include Linked Files” box or Save a .pdf. NOTE: You can also Type out text in a Vector drawing program and easily turn it into outlines or paths with a click of a button. Our cutter will then recognize these outlines and can cut the text to shape.
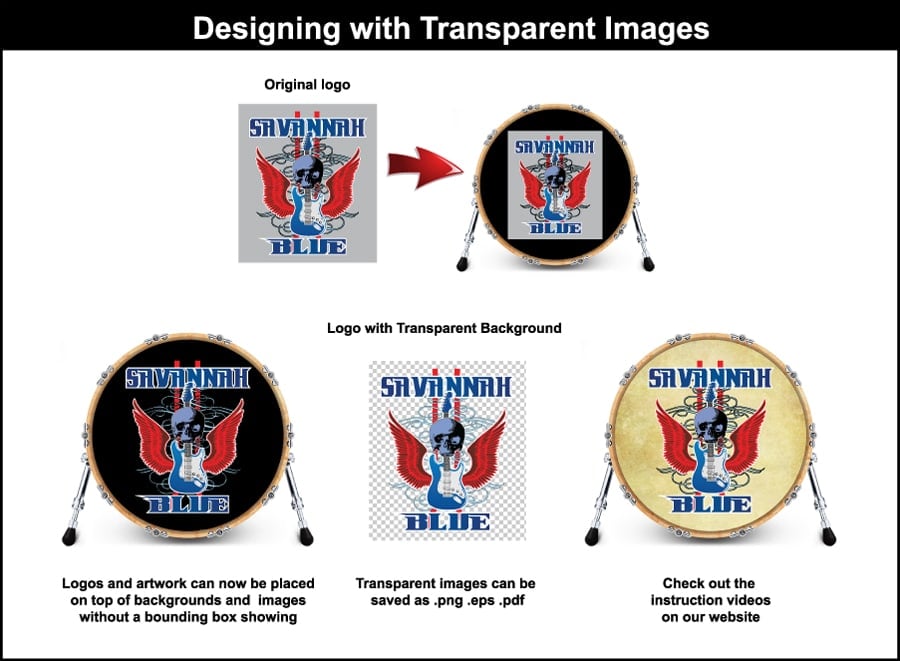
Create Images with a Transparent Background
Transparent images are useful when you intend to display your image in front of backgrounds, photos, and graphics. Check out these two videos below for instructions. See Example.
Raster Images Video
Vector Images Video
How To Scan Your Cd Cover To Fit A 22″ Drumhead
Let’s say you want your CD cover on a 22″ size head, it is 4.74″x4.75″, with a quality of at least 120ppi at actual size. You will need to scan your CD at 556ppi. When we enlarge your file to fit a 22″ head, it will scale to 120ppi at actual size. (Printed CD’s will have a moiré pattern. See the tip below to eliminate this pattern.)
Scanning Tips
How To Eliminate Moiré Patterns – From Printed Images
Anything printed with an offset press will have a moiré pattern. To get rid of the pattern, open your image in PhotoShop; under SELECT choose”All”, under FILTER choose “Blur – Gaussian Blur”, choose a Radius of .1 to 9 and this will help get rid of the moiré pattern.